Room correction setup guide for ML’s

MartinLogan Audio Owners Forum

Help Support MartinLogan Audio Owners Forum:

This site may earn a commission from merchant affiliate links, including eBay, Amazon, and others.

JonFo

Super Moderator
Staff member
Moderator
Joined
Jan 16, 2005
Messages
5,029
Reaction score
769
Location
ATL Area, GA
This thread will cover the topic of how to accurately measure and setup a MartinLogan based system using modern room correction systems, such as Audyssey, found on many new processors and receivers.

The thread will primarily be about the measurement process, but it will also cover certain setup and room-related issues that have a strong bearing on the how well the room correction will ultimately perform.

The first thing to say is that one of the most important aspects here is the actual measurement process itself. I can’t stress enough that how the mic is handed, and where it’s placed during the sequence has a huge impact in the resulting outcomes.

The analogy is that you can take a top-notch D-SLR camera, and if you try and shoot straight into a light, or with sun streaming in at an angle into the lens (lens flare), the pictures will have unnatural anomalies in them. It’s not that the camera can’t take good pictures; it’s that the operator exceeded the reasonable limits of the system. Proper care in how it’s used will result in great pictures.

Same with these modern ‘automatic’ room correction devices, it’s all in how you provide them input.

Before we get started, If you are wondering what a ‘room corrector’ is, here’s a post I did on Audyssey. http://www.martinloganowners.com/~tdacquis/forum/showthread.php?p=94363&#post94363
 
Last edited:
Background

There are two basic tricky parts to measuring a MartinLogan set vs. ‘normal’ speakers:

  1. They are dipoles – Which means that there is much more happening in terms of reflected sounds in the room, and this adds substantial complexity regarding how to setup and measure
  2. They are line-sources – Which is both good from a dispersion and depth-of-field perspective, but also means height needs to be considered as well.
Center Channels can be very tricky to set up and measure. More so with ML as well see.

There is a great set-up guide already written for the Audyssey measurement process that we will be referencing as a basis for many of the topics. This thread will expand or override the guidelines as necessary to reflect the unique properties of dipole, line source electrostats.

For those interested in more detail about the tech and theory behind these advanced room correction systems, there is a wealth of information in the Official Audyssey thread over on AVS. Warning, there is a pretty bad signal-to-noise ratio in that thread, but posts most worth reading are by: Pepar, LarryChannin, batpig, FilmMixer, David Aiken, (+ others I’m forgetting now) and of course, Audyssey. Oh, and that real nut-case: JonFo ;)

Another great link: the Audyssey FAQ and Audyssey 101 guide. Please read those if you are new to room correction and Audyssey.

And this one focused on Subwoofer setup has plenty of complimentary info.
 
Last edited:
How and where to position the mic

How and where you place the mic during calibration has a LOT to do with whether you get a good result or not.

If the results do not seem right, then re-do the measurements.

It generally takes new users three to four tries before they learn enough to get this right.

Secondly, do not tweak the distance settings Audyssey auto-detects. Unless off by >5ft, it is probably correct, as it factors in any additional delays introduced by downstream processing (typically in powered subs).
Levels are OK to adjust a bit if you must, but frankly, should be left alone if you picked a good measurement grid.

I’d recommend doing as many positions as the product supports, most can do at least six.

The set-up guide goes into a lot of detail about the measurement process, read it, re-read it, then apply the modifications outlined here for our ML’s.

I’d recommend specifying the last three measurements in a tight little cluster +/- 2ft from the prime position (#1) and varying the height of the mic by six inches or so.

This will allow the process to ‘see’ more of the room, and to better correct for the fact that ML’s are big line sources, as well as get more of the vertical modes of the room.

The need for a mic boom based mount for the mic is critical, I documented a good bit of it on the Audyssey thread over on AVSForum.

http://www.avsforum.com/avs-vb/showthread.php?p=16221900#post16221900
http://www.avsforum.com/avs-vb/showthread.php?p=16222398#post16222398
http://www.avsforum.com/avs-vb/showthread.php?p=16224812#post16224812

And for those who want a quick path to the mic stand and adapter, here are the two products you will need from a vendor I trust:

Stand: http://www.sweetwater.com/store/detail/MicStdBoomLt/
Adapter: http://www.sweetwater.com/store/detail/CameraAdapt/
 
Last edited:
Before measuring

Ensure you have the quietest noise levels possible, so turn off the HVAC, fridges, etc. that could be heard in the room where you are measuring. One has to optimize for some baseline, and since the fridge, HVAC, etc. are not always on, it is recommended to EQ against the quietest background one might consistently have.

This means that there won’t be undue EQ for things like a projector fan noise when the PJ is off.

Although conversely, it does mean that the fan noise will impinge on the quality of the sound if it’s on.
But then, any extraneous noise does.

So the idea is to EQ without any *variable* noise source present when measuring.

Create a cheat-sheet guide for yourself. Hand-draw (or use Visio) an outline of the room, the speakers and here you will be placing the mic. Create and review this diagram against the recommendations in the set-up guide and this thread.
This will make it easy to just focus on the process of moving the mic around, and not having to wonder where it goes next during the measurement process.
It will also help you keep track of which patterns work and which ones don’t. Trying to remember where one put the mic six or eight times for each measurement run is impossible. Document.

Make sure you can actually move the mic and mic stand around to the mapped out locations.
 
Last edited:
Handling Phase error

During measurement of dipoles, it’s common to see the measurement process report a ‘Phase error’.
Phase error reports are driven by either of these possibilities:
  1. Your speaker is really out of phase and reversing the leads to it is the fix
  2. Your big dipole radiator energizes reflections that fool Audyssey into thinking the speaker is out of phase when it's not. Re-measure.
To confirm it's one or the other, do a 'test', re-measure with the mic placed in the near-field of the speaker in question. That is, within six or eight feet of the panel, and as directly aligned with its center as possible

Always take the phase error with a bit of skepticism, look into it but often, it’s just fooled by reflections.

Remember, our MartinLogans are large, linesource dipole radiators, and the rear wave from the panels is out of phase. If that rear wave energy has a short enough reflected path to the measurement mic (typically six or so feet relative to the front direct energy), then Audyssey can miss-read the phase on that channel.

Again, that can be verified by placing the mic closer to the speaker in question, and re-doing a measurement and checking phase on that speaker.
If that speaker is good, then leave it alone, and re-do the entire Audyssey measurement for the rest of the speakers.

Addendum 11/2009: Note that several ML models feature out of phase woofers realtive to their panels. This is a design decision that normally improves panel to woofer integration. But it can be seen as an error by Audyssey. Ignore it if your model is designed this way.

Audyssey totally depends on a well executed measurement run for its accuracy. Practice makes perfect, so don’t be afraid to redo these several times.
 
Last edited:
Large vs small

The preamp / receiver will set the crossovers automatically. If you have a sub, I’d recommend leaving (or setting) all speakers to small. As a for instance, my Monoliths are set to small in my Denon AVP-A1HDci.
Please read the set-up guide and the Audyssey CTO’s blog post about large vs small for further details and rationale.

The system will set the correct crossovers between each speaker and sub based on in-room measurement not the ‘specs’.

See more detail on this topic in this Blog posting by the Audyssey CTO on Small Vs. Large.
 
Last edited:
Center channel

Some discussion about why ML centers are hybrids, specifically, why they use a tweeter http://www.martinloganowners.com/~tdacquis/forum/showthread.php?p=92827
This is important background, as it covers some of the compromises and challenges in their design, which need to be accommodated for in the measurement process.

Since ML centers have limited vertical dispersion between 800hz and 2Khz (the panel covers that range), it is vital to ensure the speaker is correctly located and aimed at the listening area, otherwise, that frequency range could be over-boosted and sound quite unnatural.

Looking at many of the member system pictures with ML centers, it’s common to see these speakers placed way to low relative to the L/R and just too close to the floor (which causes problems regardless of speaker design).

Another common challenge is no dampening of the rear-radiation from center models with open panel designs (Stage, Theater, Cinema). If untreated, this will cause serious direct-reflections from the cabinet / wall behind these speakers, smearing their sound. Dampening this before measurement is critical.

Once the center is at an appropriate height and aimed at the primary listening area, ensure there are no furniture elements blocking the ‘view’ between the mic measurement locations and the speaker.

If a coffee table blocks some of the measurement locations from having a direct line-of-sight path to the center speaker, the room correction will over-boost certain frequencies (especially the highs).

Therefore, if you can’t change the furnishing arrangements, then eliminate that location from your measurement map. It’s preferable to measure in a tighter cluster, than to measure ‘bad’ locations and distort the results.
 
Mic locations for MartinLogan line-source speakers

This ‘mic must see the speaker’ guideline actually applies to all speakers. If the mic is ‘shaded’ by furnishings in any of the desired measurement locations, then change the location to an adjacent one that can ‘see’ all the speakers.

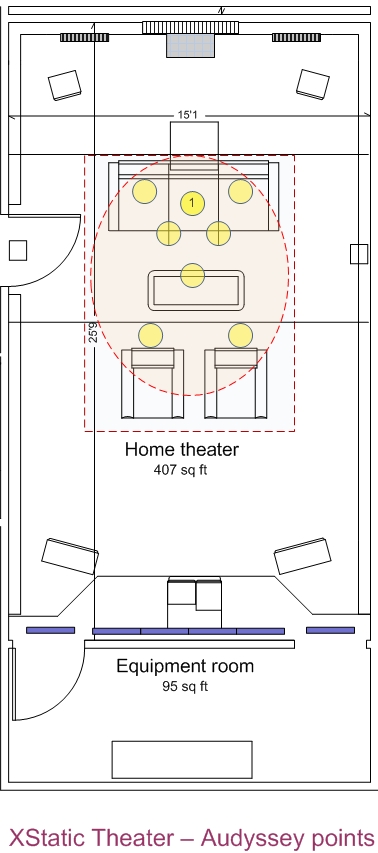
The best place to start with picking locations is to look at the map of your room and speakers and draw a rectangle within it that is bounded by the inner edges of the speakers.
The leading edge (front) of the bounding box should be no less than the distance between the L/R speakers.
This is to ensure the mic primarily picks up the front wave vs the reflected energy from the rear.

Another rule of thumb I’d propose for adjusting the box is that it should be shrunk until all possible rear-energy reflection paths are longer than 6’.

For example, this is the bounding area for my dedicated theater system:

Audyssey_Mic_Positions-floorplan.jpg


And here is an example of a more ‘normal’ room setup and where the bounding box would go:

[Todo - picture of ‘standard’ room layout]

Note that these bounding boxes get a lot smaller than people might expect and that often, actual seating locations in the room fall outside of the box. That’s OK, as no matter what you do, those will be inaccurate seats anyway. So, rather than let them negatively influence the measurements, we just eliminate them from the position grid.

An interesting side-effect of this computation is that you now have a good idea where the ‘good’ seats are in your room. If you want every seat to have reasonable sound, then they must be within this bounding box.

[2024 addenda] Now that immersive audio (Dolby Atmos) is a thing, and experimentation shows that the resulting EQ is improved, I've shrunk the bubble down to just the MLP +/- 6 to 10" left/right and up/down.
 
Last edited:
The Measurement bubble

The post above covers the horizontal plane locations for the mic, but what about the vertical (height) plane?

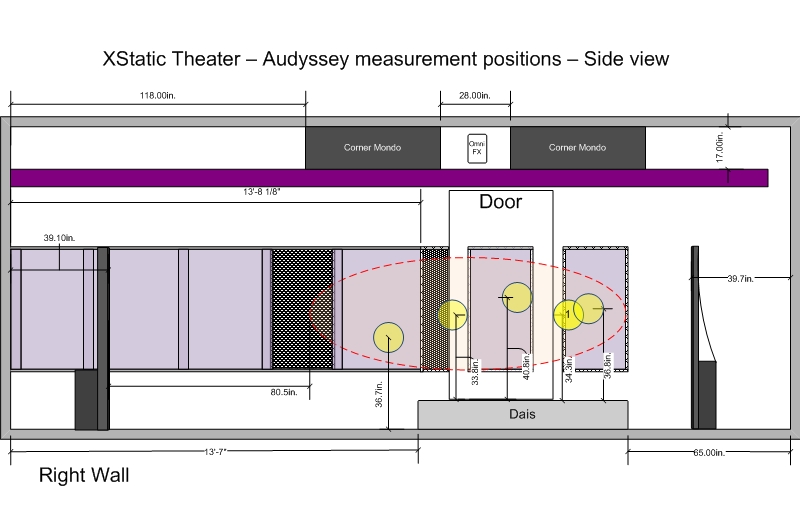
I’ve found that a line-source speaker benefits from a couple of sample points taken a few inches above the ‘normal’ point. Therefore I recommend that two of the sample points be taken with the mic raised by 4 to 6” above the point used in position #1. I also recommend that these two positions be within +/- 2’ of position #1 (I personally do these at 8” L/R from prime position).
In no case should the height exceed the height of the L/R speakers and should not fall outside the dispersion range of the center channel panel either.

As seen in the illustration below, this creates a bubble within which measurements can be taken.
The diagram shows the locations I place the mic in my room.

Audyssey%20Mic%20positions%20side%20view.jpg


I highly recommend starting off with a fairly tight spacing around the prime position within your bubble, and then proceed to expand (if needed) into other spaces within the bubble.

Most room correction problems occur because people measure locations well outside the bubble.
 
After the measurements

Now that the big task is done, sit back and enjoy the music. But realize that it will quite different than before.
Most people take a few days to get used to the much cleaner output from an Audyssey corrected system.
Mostly because the big +10 or even +20db room-induced bass peaks are now damped.

However, if you feel a certain frequency is over-corrected, pay attention as to why that might be, is it just that the prior state of inaccuracy was so large (and you got used to it) that a corrected version sounds ‘weird’ at first? Letting a few days go by will allow you to better assess this.

As I was learning to do the setups, I did have a couple of correction results that were not right, and after a few days, it was evident something needed to be re-done. So I did (after studying more) and saw improvements.

Even with the optimal measurement process, the results are still surprising for many, as they’ve probably never heard a small room system sound ‘correct’.

Besides frequency response, you should also enjoy a larger, more focused soundstage, as some of the early resonances and reflections will have been mitigated by the process, but these effects tend to be position-dependent, obviously being better the closer one is to the prime position.

So there you have it, the steps and the background to hopefully have a much improved sound from your ML setup.

Now, let’s discuss and see what questions come up.
 
Last edited:
Is this an appropriate question for this thread?

What is the difference between Tact and Audyssey
 
HUGE thanks for this wealth of information, it will certainly come in handy :bowdown:
 
A couple more thoughts on measurement process

Dealing with measurements near seats

Many measurement points will be taken right over or very near a seating location.

When swinging the mic boom over the seats to take a measurement, I always ensure I ‘simulate’ the acoustic profile of a human in the seat. This is particularly important if the seats are leather covered.
Leather is quite reflective at mid and high-frequencies. These early reflections from the seats in to the mic can skew the measurements in the HF pretty badly. So we want to minimize the chances of this by doing some of the following.

Using some thick, absorbent cloth or foam material, such as a folded-over quilted bedspread, or very, very thick terry cloth towels, folded in four, put these on both the horizontal seating surface, and draped over the seat backs. The idea is to cover the seat at least as much as your clothed body would (you do watch movies with your clothes on, right? ;) ).

Therefore, every time you move the mic to a new location, you will also be moving the seating absorption (or for a couch, try and cover as much as possible at once).

Seat backs

I did mention that it’s important not to let furniture, such as a coffee table ‘shade’ the mic from seeing a speaker. But It’s important to reiterate that tall seat backs can also do that.

If you have a tall-backed recliner, lean the seat back to the position you’d normally have it when listening. Then after the absorption has been layered on it, make sure the mic tip is higher than the top of the seat back in terms of seeing the rear speakers.

Rear speaker positioning

If raising the mic to be above the seatbacks places it too high or outside the bubble, then consider repositioning your rear speakers. Otherwise, the room correction system will over-boost the highs in the rear.

So if your rear-channel is an Aerius or Source / Purity sitting on the floor and the tops of their panels do not ‘see’ over the seat backs, then place them on stands that will both raise their panel heights and tilt them forward enough so the panels are at a pure 90 degree angle to the floor.

Anyone with Gen 1 speakers that are 72” tall and have pure-vertical panels will be OK. SL3’s will need to be tilted and raised. Again, only for speakers doing rear-channel duties.
 
As I pointed out before, diagramming your room in both horizontal and vertical dimensions and finding your measurement bubble will help you better position your equipment and seating to allow for best possible results during measurements. If both are done, the resulting room correction will be quite accurate and pleasing.

If you are willing to do diagrams like I’ve posted above of your own rooms, I’d be happy to overlay the mic positions I’d recommend for your setup.
 
Last edited:
[Robert clarified his question via PM: He’s asking about the Audyssey SoundEQ ]

Robert, I use the Audyssey functions embedded in the awesome reference preamp from Denon, the AVP-A1HDci

I use balanced audio paths between the pre and the rest of my gear.

I also use the Audyssey Pro software and calibrated mic to perform my setups. It comes with it's own balanced mic preamp.

The Sound EQ product is very nice, and includes a license to Audyssey Pro.

But these days, I'd recommend looking at the latest preamps with the feature built-in. The integration of EQ as well as DynamicEQ, Dynamic Volume, and other features is worth it.
 
Last edited:
Thank you.

Since I gave up HT some years ago (I spent tons of money and hardly ever watched movies). I am looking for a 2.2 equalizer device. Since we remodelled the house, my listening room is a bear to tame. I have some room tuning panels that I used before but they aren't enough and it seems that it may be less expensive to hang an Audyssey or Tact up front.

I looked at the preamps (Denon, Onyko and NAD) listed on the Audyssey site and they seem to be overkill for my implementation.

Thanks again

There's the Behringer DEQ2496 and DbX makes a similar digital equalizer. I have the Behringer, which has some sort of auto equalization, although it takes some work just to figure out.
But it has in addition to the graphic EQ module, parametric and dynamic EQ's, the latter good for conditions varying with sound level. Time delay functions, which have worked better than the phase control on my subs, and a host of other modules and controls.
Recently, I've gotten off my butt and measured the room for common resonanses. A large cut @ 50 Hz and lesser on the harmonics improved things vastly, unmasking other resonant products at higher frequencies.
Worth looking into.
 
Awesome thread yet again. I did not realize about the placement within the box and you have me excited to go home and experiment. My during my last run of the EQ I placed the mic in the actual listening positions, with probably 1/3 being outside the box you recommend. The setup makes a lot of sense when it is all laid out.
 

Latest posts

Back
Top